
How to add alternate color to a grid (list) in D365 Portals?

    
In this post, let us how we can add back-ground colors to a view/ list in MS CRM/ D365 Portals?
Showing a grid/ list with alternate colors is a general requirement, which can be achieved by adding a simple JQuery snippet to the respective web page custom JS.

This can be performed in two ways.

  • directly adding the JQuery snippet to the page on the portal (with admin account - inline editor)
OR
  • by navigating to Portal Management (Module or App) -> Respective Web Page -> Localized Content -> Advanced -> Custom JavaScript
Now let us see, what to and how to add the script:
directly adding the JQuery snippet to the page on the portal:
  1. Go to the portal
  2. navigate to respective page and click on "Edit"
  3. Go to "Options" -> Under "Custom JavaScript" add the below snippet
$(document).ready(function () 
{
    $(".entitylist.entity-grid").on("loaded"function ()
{
    $(".view-grid tr:even").css("background-color""#BACAE2");
    $(".view-grid tr:odd").css("background-color", "#D7DFF0");
    $(".view-grid th").css("background-color""#4878D9"); 
    $(".view-grid th a").css("color""#FFFFFF");
    $(".view-grid td").css("border", "#FFFFFF solid 1px")
    $(".view-grid th").css("border", "#FFFFFF solid 1px");
  });
});


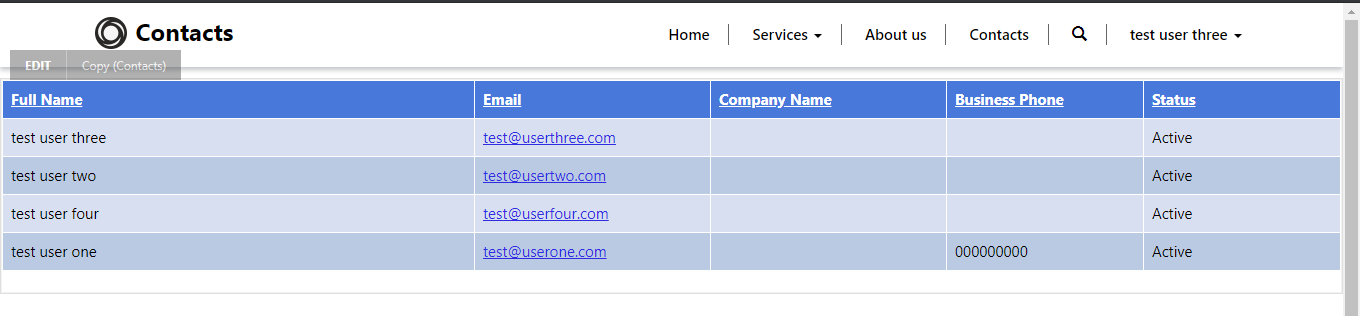
  • $(".entitylist.entity-grid").on("loaded", function () - this function gets triggered on the list loading. So, we are using this function to change the color of the list while loading.
  •  $(".view-grid tr:even").css("background-color", "#BACAE2"); -this is to update even numbered rows with #BACAE2
  •  $(".view-grid tr:odd").css("background-color", "#D7DFF0"); - this is to update even numbered rows with #D7DFF0
  •  $(".view-grid th").css("background-color", "#4878D9"); - this is to update the headers with #4878D9
  •  $(".view-grid th a").css("color", "#FFFFFF"); - this is to update the header labels with #FFFFFF
  •  $(".view-grid td").css("border", "#FFFFFF solid 1px"); - this is to add border to the each cell in the data with #FFFFFF
  •  $(".view-grid th").css("border", "#FFFFFF solid 1px"); - this is to add border to the each header label with #FFFFFF

Comments

Popular posts from this blog

Validate an email input in a Canvas Application | PowerApps

Validate an email input in a Canvas Application | PowerApps In this post let us see, how to Validate an email input in a Canvas Application UI Validations helps us to ensure, valid data is received from the End User to complete an operation helps end user to provide right information the validation action depends on the type of the input control for Text Input Control - mostly we go with "OnChange" for check box control - "OnCheck and On uncheck" for Drop Down and Combo Box Controls - "OnChange" or "OnSelect" etc., Now, let us see how can we validate an email input, a phone number input and a name input. How to validate an email input value is valid? We can leverage "Regex" (Regular Expressions) to valid user inputs. Let us consider the Email Input Control Name as -  txtEmail.Text. OnChange of this Control let us i

How to create a "pop-up box" in PowerApps

in this post, let us see how to create a Pop-Up in Canvas App required controls: rectangular icon label buttons - 2 take a "rectangular icon" and make it screen size update it's "Fill" - with RGBA(175, 191, 224, 0.5) . Take another "rectangular icon" and adjust it to center Take "label" - and add required text (Eg: "do you want to proceed?") Take two buttons. Update text of Button1 to "OK" and other to "Cancel" On Click of the respective control (to open the pop-up), add this expression : UpdateContext({locOpenPopup:true}) select "cancel" and "ok" button and add UpdateContext({locOpenPopup:false}) on "OnSelect" property. add appropriate actions on "cancel&quo

Success confirmation on a record submission - Canvas Application

In this post let us see, how to show a successfully submitted record's data back on to the form, as a confirmation. Take two screens  Home Screen Success Screen On Home Screen: Take a Form Control on the Home Screen and map it to respective entity. In this post we are mapping it to Registrations entity. Take a Button Control and input the below expression, to create records into Registrations Entity. SubmitForm( frmRegistration ) Now, let us implement how to redirect the user to Success Message screen to successful record submission. In order to achieve this, we are going to make use of one of the Form Control's properties - OnSuccess. So, OnSuccess we are going to implement Success Screen navigation as below Navigate(' Success Screen ')   Success Screen Take a label to show - success message, as below "Registration was successful. Registration Id: " & frmRegistration .LastSubmit.'Registration Number' LastSubmit  property of a From Control helps u